If your shoulders feel like they’re permanently stuck in “hunched mode,” you’re not alone. Hours of desk work, scrolling on phones, or lifting weights without enough mobility work can create stiffness that lingers all day.
Tight shoulders aren’t just uncomfortable—they can cause neck pain, restrict arm movement, and even trigger headaches.
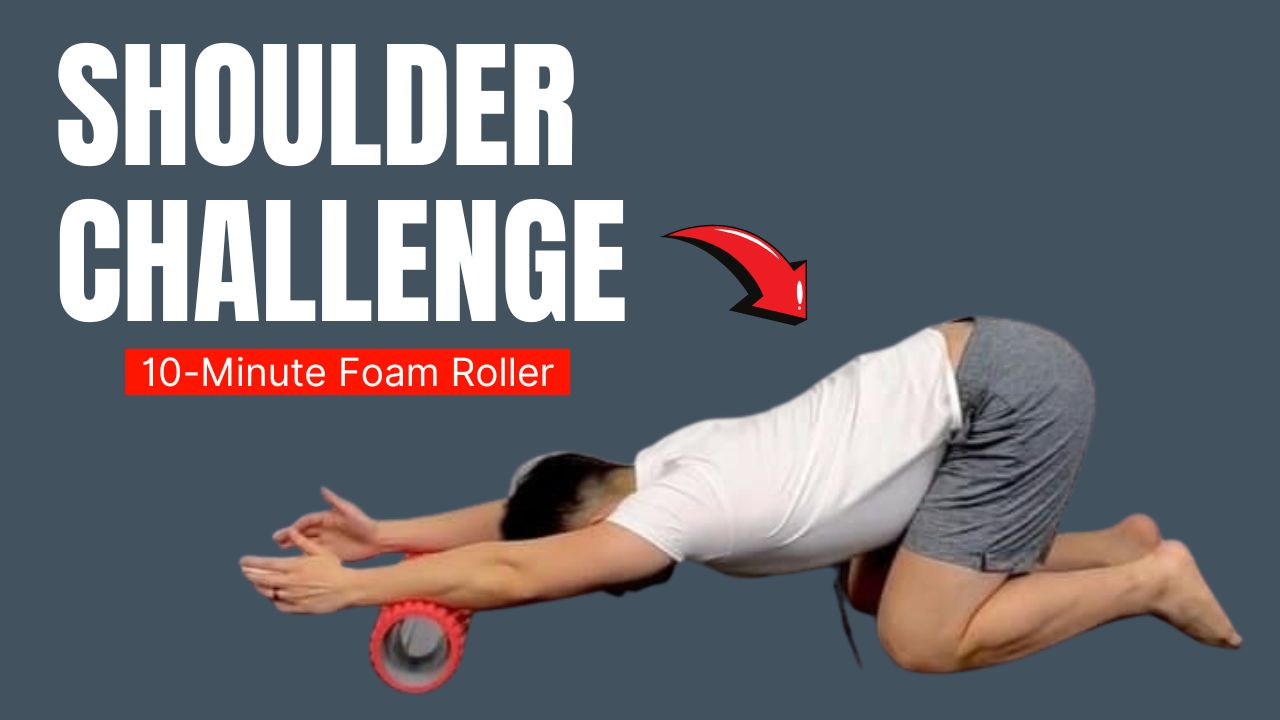
The good news? You can reverse this tension in just 10 minutes a day with a foam roller. Think of it as a self-massage tool that targets deep knots, improves circulation, and restores your range of motion, without needing a trip to the physiotherapist.
Did you know? Tight shoulders can limit your lung expansion by up to 30%, making it harder for your body to get enough oxygen during workouts. Loosening them isn’t just about comfort—it’s about better performance and overall health.
This challenge is designed to target all the major areas that contribute to shoulder tightness: your upper back, lats, chest, and traps. By the end of these 10 minutes, your shoulders will feel lighter, looser, and more mobile.

Table of Contents
Why Foam Rolling Works for Shoulder Mobility
Foam rolling works through a method called self-myofascial release. It applies pressure to fascia—the connective tissue around your muscles—helping break up adhesions, improve blood flow, and signal your nervous system to relax tight areas.
Research shows that foam rolling:
- Improves flexibility without reducing strength.
- Helps reduce delayed-onset muscle soreness (DOMS).
- Supports better posture by releasing overactive muscles.
Myth Alert: Foam rolling does not “break up” scar tissue in the literal sense. Instead, it stimulates mechanoreceptors and increases tissue elasticity, giving the sensation of looseness.
What Can Happen After 30 Days of This Foam Rolling Challenge
| Positive Changes You May Notice | Why It Happens |
|---|---|
| Improved shoulder mobility and range of motion | Regular rolling releases tight fascia and muscles, allowing freer movement. |
| Reduced shoulder, neck, and upper back tension | Pressure stimulates relaxation and eases chronic tightness. |
| Better posture with shoulders naturally sitting back | Loosening chest and upper back muscles reduces forward shoulder rounding. |
| Decreased frequency of tension headaches | Reduced trap and neck tension can ease headache triggers. |
| Enhanced performance in overhead lifts and daily activities | Greater flexibility allows smoother, stronger movement patterns. |
| Less post-workout soreness | Improved blood flow helps muscles recover faster after training. |
| Easier breathing and deeper lung expansion | Better posture opens up the rib cage and improves respiratory function. |
Do’s & Don’ts for Foam Rolling Tight Shoulders
| Do’s | Don’ts |
|---|---|
| Use slow, controlled movements to target the muscle tissue effectively. | Don’t roll too quickly—this reduces the effectiveness and can irritate muscles. |
| Focus on breathing deeply to help your muscles relax during each roll. | Don’t hold your breath, as it increases tension in the muscles. |
| Apply moderate pressure and adjust based on your comfort level. | Don’t use excessive force that causes sharp pain or bruising. |
| Pause for 15–20 seconds on tender spots to allow tension to release. | Don’t roll directly over joints, bones, or injured areas. |
| Warm up with light movements before deep tissue rolling. | Don’t start with aggressive rolling on cold muscles. |
| Combine foam rolling with stretching for better long-term mobility. | Don’t rely solely on foam rolling to fix posture or shoulder tightness. |
| Use a medium-density roller if you’re new to foam rolling. | Don’t start with an overly hard or textured roller if you’re a beginner. |
| Stay consistent—aim for 4–5 sessions per week for best results. | Don’t expect lasting changes from a single foam rolling session. |
The 10-Minute Foam Roller Shoulder Mobility Exercises
Below are seven exercises that target different aspects of shoulder tightness. Perform them in sequence for the full benefit.
1. Thoracic Spine Extension on Foam Roller
Description: The thoracic spine (upper back) often becomes stiff from slouching, which pulls the shoulders forward. This exercise restores extension and allows your shoulders to sit back naturally.
How to:
- Sit on the floor with the foam roller placed horizontally under your upper back.
- Support your head with your hands and keep your elbows close together.
- Gently lean back over the roller, extending your upper spine.
- Hold for 2–3 seconds, then return to neutral.
- Roll up and down from mid-back to the top of your shoulder blades for 8–10 reps.
2. Lat Roll
Description: Tight lats can limit overhead movement and pull your shoulders downward. Rolling them can restore overhead flexibility.
How to:
- Lie on your side with the foam roller under your armpit, angled slightly toward your back.
- Extend the bottom arm and keep your top leg bent for stability.
- Slowly roll from your mid-back up to just below your armpit.
- Pause at tender spots for 5–10 seconds.
- Repeat for 30–45 seconds per side.
3. Pec Minor Release
Description: The pec minor, located under your chest muscle, often shortens due to poor posture, pulling your shoulders forward.
How to:
- Lie face down with the foam roller placed diagonally under your upper chest.
- Keep the arm on the rolling side extended slightly out to the side.
- Roll gently across the upper chest, focusing near the front of the shoulder.
- Spend about 20–30 seconds per side.
4. Upper Trap Roll
Description: The upper trapezius muscles, running from your neck to your shoulders, often get tense from stress and sitting.
How to:
- Lie on your back with the foam roller positioned under your upper traps.
- Tilt your head slightly to the side to expose more muscle.
- Roll gently forward and backward, stopping at any tight spots.
- Continue for 20–30 seconds on each side.
5. Shoulder Blade Mobilization
Description: The muscles under and around the shoulder blade (scapula) can become sticky and limit smooth movement.
How to:
- Lie on your back with the foam roller placed at an angle under your shoulder blade.
- Place the arm on the same side across your chest.
- Slowly roll over the outer edge of the blade, pausing at sore areas.
- Roll for 20–30 seconds per side.
6. Posterior Shoulder Roll
Description: This targets the back side of the shoulder, improving external rotation and reducing tension from overuse.
How to:
- Sit with the foam roller behind you.
- Lean back so that the roller is under the back of your shoulder.
- Cross your arm over your chest to expose more muscle.
- Roll gently in small movements for 20–30 seconds per side.
7. Arm Sweep Stretch with Foam Roller
Description: Combines myofascial release with an active stretch to open the chest and improve shoulder range of motion.
How to:
- Lie face down with the foam roller under one arm (just above the elbow).
- Sweep the arm out to the side, then up overhead in a slow arc.
- Keep your palm facing down and your chest close to the floor.
- Perform 6–8 sweeps per side.
Additional Tips for Better Results
- Breathe deeply during each roll—holding your breath increases muscle tension.
- Avoid rolling directly over joints or bones.
- Focus on slow, controlled movements rather than rushing.
- If you find a tender spot, hold for 15–20 seconds before moving on.
Did you know? Most people’s shoulder pain actually originates from poor mobility in the thoracic spine, not the shoulder joint itself.
The 10-Minute Foam Roller Challenge Routine
| Exercise | Time per Side | Total Time |
|---|---|---|
| Thoracic Spine Extension | — | 1:30 min |
| Lat Roll | 0:30 sec | 1:00 min |
| Pec Minor Release | 0:30 sec | 1:00 min |
| Upper Trap Roll | 0:30 sec | 1:00 min |
| Shoulder Blade Mobilization | 0:30 sec | 1:00 min |
| Posterior Shoulder Roll | 0:30 sec | 1:00 min |
| Arm Sweep Stretch | 0:30 sec | 1:00 min |
| Total | — | 10 min |
Tracking Your Progress in the Challenge
To get the most out of this routine, perform it at least 4–5 times per week. Track your progress by noting:
- Range of motion: Can you reach higher overhead or clasp your hands behind your back more easily?
- Pain levels: Does your neck and shoulder tension reduce throughout the day?
- Posture: Do your shoulders sit naturally back without conscious effort?
Closing Thoughts
Stiff shoulders can be a barrier not only to comfortable movement but also to athletic performance. The 10-Minute Foam Roller Challenge is an accessible, effective way to reverse years of tension with minimal equipment.
By targeting your thoracic spine, chest, lats, traps, and shoulder stabilizers, you’re not just loosening muscles—you’re restoring healthy shoulder mechanics. Give it a week, and you’ll likely feel lighter, move more freely, and maybe even breathe easier.
Frequently Asked Questions (FAQs)
Can foam rolling really help loosen tight shoulders?
Yes. Foam rolling applies targeted pressure to tight muscles and fascia, helping reduce tension, improve blood flow, and restore range of motion. Consistency is key for long-term results.
How often should I do this 10-minute foam roller routine?
For best results, aim for at least 4–5 times a week. If your shoulders are extremely tight, you can even do it daily.
Do I need a specific type of foam roller?
A medium-density foam roller is ideal for beginners, as it provides enough pressure without being overly intense. More advanced users may prefer a textured or firm roller.
Is foam rolling supposed to hurt?
Some mild discomfort is normal when working on tight muscles, but it should never feel sharp or unbearable. Reduce pressure or adjust positioning if pain is too intense.
Can I do these exercises before or after a workout?
Yes. Foam rolling before exercise can improve mobility, and doing it afterward can help reduce muscle soreness.
What if I have shoulder injuries?
If you have an acute injury or severe pain, consult a healthcare professional before attempting foam rolling. Gentle pressure may help in some cases, but avoid rolling directly over injured tissue.
How long until I see results?
Many people feel immediate relief after one session, but lasting improvements in posture and flexibility typically occur within 2–4 weeks of consistent practice.
Can foam rolling replace stretching?
Foam rolling is best used alongside stretching and strengthening exercises. While it helps release tight muscles, stretching maintains and improves flexibility.
Can I do foam rolling without lying on the floor?
Yes. Some moves can be adapted to a standing or seated position against a wall, which is useful for those with difficulty getting on the floor.
What’s the biggest mistake people make when foam rolling?
Rolling too quickly or directly over joints and bones. Slow, controlled movements with focus on muscle tissue are the most effective.